
If I as a tournament director saw a game starting like this I suppose I would have to follow the game to make sure a real game was being played - not just some meaningless moves camouflaging a pre-arranged draw. That being said, 1...a6 is quite a reasonable reaction to White’s attempt at passing the initiative over to Black. Now we are back to square one so to speak, and it’s White’s task to demonstrate that the two extra moves haven’t hurt his winning chances. That he may attempt with most reasonable moves, including 2.Nf3, 2.c4, 2.g3, 2.Nc3 and 2.f4. However, for the sake of simplicity I will limit myself to White’s two main ‘first’ moves: 2.d4 and 2.e4. And in order not to make an overly long entry, I will have to split the subject into two.
2.d4
I assume Eric Prie, who preaches the virtues of 1.d4 d5 2.a3, would already be very pleased with White’s position. White can safely develop his dark-squared bishop as any attack on b2 by a black queen going to b6 can safely be met by b4 or Ra2.
2.d4
I assume Eric Prie, who preaches the virtues of 1.d4 d5 2.a3, would already be very pleased with White’s position. White can safely develop his dark-squared bishop as any attack on b2 by a black queen going to b6 can safely be met by b4 or Ra2.
A:
2...d5 (Dia)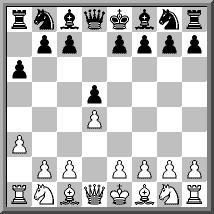
2...d5 (Dia)

This certainly must be a sound move. However, if there is anything at all for White in the Prie System, this should be a great chance to demonstrate White’s edge:
a) 2...c5?
b) 2...f5 3.g3 (3.Nf3 b5) 3...Nf6 4.Bg2 g6 5.Nf3 Bg7 6.0–0 0–0 7.c4 d6
3.Nf3
a) 3.c4?! has more or less been eliminated as an option. After 3...dxc4 White will have a hard time regaining his pawn
b) 3.e3?! appears illogical as a3 isn’t a particularly useful move either in the Colle or in the Queen’s Gambit Declined. Despite of that White had an edge after 3...Nf6 4.c4 c6 5.Nc3 e6 6.Bd3 dxc4 7.Bxc4 Bd6 8.Nf3 0–0 9.e4 in Bodi-Deli, Heves 2001. Black probably should have taken his chance to play 5...Bf5! with excellent chances.
c) 3.Bf4!? may somewhat improve over 3.Nf3 (I believe that 1.d4 d5 2.Bf4 slightly improves over 2.Nf3 followed by 3.Bf4). However, not everything is so clear - for instance after 3...c5!? I assume that the pseudo-Albin gambit 4.e4 must be rather dubious as ...a6 is a useful defensive move while a3 hardly can be of much use.
3...Nf6
This is a very natural continuation and may well be where interest will focus if 1.a3 a6 should ever receive grandmasterly attention.
4.Bf4!
This certainly seems more promising than the Torre approach 4.Bg5?! which is unlikely to achieve anything if Black replies with 4...Ne4!.
4...Bf5!
Black too takes advantage of the fact that his b-pawn too can be comfortably defended.
5.e3 e6 (Dia)

a) 2...c5?
b) 2...f5 3.g3 (3.Nf3 b5) 3...Nf6 4.Bg2 g6 5.Nf3 Bg7 6.0–0 0–0 7.c4 d6
3.Nf3
a) 3.c4?! has more or less been eliminated as an option. After 3...dxc4 White will have a hard time regaining his pawn
b) 3.e3?! appears illogical as a3 isn’t a particularly useful move either in the Colle or in the Queen’s Gambit Declined. Despite of that White had an edge after 3...Nf6 4.c4 c6 5.Nc3 e6 6.Bd3 dxc4 7.Bxc4 Bd6 8.Nf3 0–0 9.e4 in Bodi-Deli, Heves 2001. Black probably should have taken his chance to play 5...Bf5! with excellent chances.
c) 3.Bf4!? may somewhat improve over 3.Nf3 (I believe that 1.d4 d5 2.Bf4 slightly improves over 2.Nf3 followed by 3.Bf4). However, not everything is so clear - for instance after 3...c5!? I assume that the pseudo-Albin gambit 4.e4 must be rather dubious as ...a6 is a useful defensive move while a3 hardly can be of much use.
3...Nf6
This is a very natural continuation and may well be where interest will focus if 1.a3 a6 should ever receive grandmasterly attention.
4.Bf4!
This certainly seems more promising than the Torre approach 4.Bg5?! which is unlikely to achieve anything if Black replies with 4...Ne4!.
4...Bf5!
Black too takes advantage of the fact that his b-pawn too can be comfortably defended.
5.e3 e6 (Dia)

After the symmetric introduction it’s up to White to demonstrate that his extra tempo can be used constructively:
a) 6.Bd3 is hardly the way to go: B.Lengyel-Czebe, Budapest 1998 continued 6...Bd6 7.Nbd2 Nc6 8.Qe2 1/2–1/2. It obviously would have been able to play on for both sides but White cannot boast of any advantage.
b) 6.c4 seems more promising.
b1) If Black is content with sound but modest development White may well have a little play as he had in Frosch-Wanderer, Schladming 1994 which continued 6...Be7 7.Nc3 c6 8.h3 h6 9.Be2 0–0 10.0–0 Bd6 11.Ne5 +=.
b2) The big question is what happens if Black uncompromisingly upholds symmetry with 6...c5. Janse van Rensburg-Diedericks, Port Elizabeth 2005 continued 7.Nc3 Nc6 8.Bd3 Bg4 9.Be2 dxc4 10.dxc5 Bxc5 11.Bxc4 with rather dull equality. I suspect that 7.Rc1 may be White’s best try but that the position ultimately will prove rather barren.
B:
(1.a3 a6 2.d4)
2...Nf6 (Dia)
a) 6.Bd3 is hardly the way to go: B.Lengyel-Czebe, Budapest 1998 continued 6...Bd6 7.Nbd2 Nc6 8.Qe2 1/2–1/2. It obviously would have been able to play on for both sides but White cannot boast of any advantage.
b) 6.c4 seems more promising.
b1) If Black is content with sound but modest development White may well have a little play as he had in Frosch-Wanderer, Schladming 1994 which continued 6...Be7 7.Nc3 c6 8.h3 h6 9.Be2 0–0 10.0–0 Bd6 11.Ne5 +=.
b2) The big question is what happens if Black uncompromisingly upholds symmetry with 6...c5. Janse van Rensburg-Diedericks, Port Elizabeth 2005 continued 7.Nc3 Nc6 8.Bd3 Bg4 9.Be2 dxc4 10.dxc5 Bxc5 11.Bxc4 with rather dull equality. I suspect that 7.Rc1 may be White’s best try but that the position ultimately will prove rather barren.
B:
(1.a3 a6 2.d4)
2...Nf6 (Dia)

This is more flexible than 2...d5 and logically it should be harder to prove that a3 is useful against all set-ups available to Black. Prie has stated that he has been unable to find any advantage for White after 1.d4 Nf6 2.a3?! g6!. That’s not really surprising. However, chances should be a little better after 2...a6.
3.Nf3
a) 3.Bf4 will quite likely transpose below after 3...g6 4.e3 Bg7 5.Nf3 0–0 but 3...d5 (leading to line A above) and 3...e6 4.e3 c5 are also reasonable options.
b) 3.c4 certainly looks natural but after the further natural moves 3...g6 4.Nc3 Bg7 5.e4 d6 it seems that ...a6 is more useful than a3 in all of White’s main systems (6.f3; 6.f4; and 6.Nf3/6.Be2).
3...g6!
There’s hardly anything wrong with 3...d5 or 3...e6 4.Bf4 c5 or even 3...b5!? but the King’s Indian is one of the hardest systems to meet for London players.
4.Bf4
The London approach - not necessarily White’s best but certainly the system with which I am the most familiar. Alternatives include:
a) 4.g3 b5!? seems fine for Black.
b) The King’s Indian Torre 4.Bg5 is worth consideration.
c) Trying for the Barry/150 Attack with 4.Nc3 cannot be too bad but after 4...d5 (4...Bg7 5.e4 d6 certainly is OK for Black too) 5.Bf4, Black if nothing else has 5...Nbd7!? as Nb5 is no longer an option.
4...Bg7 5.e3 0–0 6.Be2 d6 7.0–0 (Dia)
3.Nf3
a) 3.Bf4 will quite likely transpose below after 3...g6 4.e3 Bg7 5.Nf3 0–0 but 3...d5 (leading to line A above) and 3...e6 4.e3 c5 are also reasonable options.
b) 3.c4 certainly looks natural but after the further natural moves 3...g6 4.Nc3 Bg7 5.e4 d6 it seems that ...a6 is more useful than a3 in all of White’s main systems (6.f3; 6.f4; and 6.Nf3/6.Be2).
3...g6!
There’s hardly anything wrong with 3...d5 or 3...e6 4.Bf4 c5 or even 3...b5!? but the King’s Indian is one of the hardest systems to meet for London players.
4.Bf4
The London approach - not necessarily White’s best but certainly the system with which I am the most familiar. Alternatives include:
a) 4.g3 b5!? seems fine for Black.
b) The King’s Indian Torre 4.Bg5 is worth consideration.
c) Trying for the Barry/150 Attack with 4.Nc3 cannot be too bad but after 4...d5 (4...Bg7 5.e4 d6 certainly is OK for Black too) 5.Bf4, Black if nothing else has 5...Nbd7!? as Nb5 is no longer an option.
4...Bg7 5.e3 0–0 6.Be2 d6 7.0–0 (Dia)

These moves are far from forced but yet a kind of London vs. King’s Indian main line.
7...Nbd7
This is Black’s most popular continuation in the similar position without the two a-pawn moves. 7...c5, 7...Nfd7 and 7...b6 are all important alternatives. In general it should be noted that systems with ...b6 seem very appropriate against this London version as the standard reaction a4 involves a tempo loss. In contrast systems with ...c5 and ...Qb6 allows White to demonstrate an advantage of his early a3, as he (after having met ...c5 with c3) frequently can protect his b-pawn with the active b4.
8.h3 Qe8 9.c4 e5 10.Bh2 Qe7 11.Nc3 (Dia)
7...Nbd7
This is Black’s most popular continuation in the similar position without the two a-pawn moves. 7...c5, 7...Nfd7 and 7...b6 are all important alternatives. In general it should be noted that systems with ...b6 seem very appropriate against this London version as the standard reaction a4 involves a tempo loss. In contrast systems with ...c5 and ...Qb6 allows White to demonstrate an advantage of his early a3, as he (after having met ...c5 with c3) frequently can protect his b-pawn with the active b4.
8.h3 Qe8 9.c4 e5 10.Bh2 Qe7 11.Nc3 (Dia)

This series of moves is known from the London system versus the King’s Indian. White’s plan is to break up Black’s queenside pawn chain with c5 and then apply pressure on c7 and d6. That may be feasible in this position too, but one of White’s resources: the move Nb5 - often including a piece sacrifice for two pawns - has been eliminated. Therefore it seems natural to conclude that in this slightly modified version White has less chance to get an advantage.


